
How to Clean Screws Nondestructively
Maintenance departments often clean screws wrongly, causing serious and expensive damage.

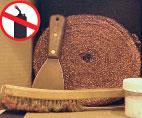
Never clean a screw with an acetylene torch. The right cleaning tools are a brass putty knife, brass wire brush, copper gauze, and stearic acid flakes.
First purge the extruder. Then remove the purging resin using brass tools and a brass wire brush, never steel. Steel will damage screw and barrel surfaces.
After removing most of the purge resin, polish the screw with copper gauze and then a soft rag.
Maintenance departments often clean screws wrongly, causing serious and expensive damage. It's unfortunately common to use an acetylene torch as part of the procedure. This is the biggest mistake that can be made, because it will destroy not only the metallurgical properties of the base metal of the screw but also affect closely machined screw tolerances.
During manufacturing of tool-steel screws, the base metal is heat treated to increase its hardness. If isolated heat from an acetylene torch is used to remove plastic from the root of the screw, it will undo the annealing of the base metal, reducing the yield strength of the steel at that point and increasing the likelihood that the screw will break because of torque.


If the area where the torch was applied turns a permanent blue, that means heat has caused metallurgical changes to the base metal and reduced the wear resistance in that area of the screw. There have even been occasions when torching caused delamination of the metal wear coating from the base metal of the screw.
Isolated heat from an acetylene torch also causes the metal to expand on the side of the screw where it's applied, which in turn causes the screw to bend. Most plasticating screws for extrusion applications are made of 4140 H.T. steel, manufactured to very close tolerances. Most tolerances are within ± 0.001 in. and straightness within ± 0.004 in. When the screw cools, it's doubtful that it will return to its original straightness.
A more efficient alternative to blow torching is to purge and clean the screw immediately after use, while it is still evenly heated from production. In high-pressure applications like wire and cable and blown film, commercial purging compounds can be used. In low-pressure applications, a fractional-melt (0.35-MI) HDPE may be sufficient as a purging material instead.
Screw size will determine how much purge material or HDPE is needed. For example, a 2-in.-diam. screw requires about 10 lb of purge; a 3.5-in. screw may require 33 lb.
For extruders that are 3.5-in. and smaller, it's possible to purge and then pull the screw and clean the screw and barrel thoroughly. With use of the proper equipment, screws and barrels up to 6-in. diam. can be purged and thoroughly cleaned in 1 to 2 hr.
Sometimes the plasticating setup for extremely large cast film or laminating lines prohibits cleaning the screw and barrel by the methods described here. For larger extruders, it may be more practical just to use a commercial purging compound for product changeovers, without pulling the screw.
PURGING PROPERLY
The first step in purging the screw is to close off the flow of the resin being processed, typically by closing the slide gate at the bottom of the resin hopper. Then reduce screw speed to 15-25 rpm and run at this speed until melt stops flowing from the end of the die.
All barrel zones should be set to about 400 F. Once the barrel zones have reached that temperature, purging can begin. Depending on the type of extrusion process, it may be necessary to remove the die or head tooling to reduce risk of over-pressurizing the end of the extruder. This is why it is very important for two operators to perform this portion of the purging process. One operator should be at the control panel to observe screw speed and drive load. The second operator needs to observe the head-pressure gauge to make sure that the system is not over-pressurized. All the while, the screw should be turning at 15 to 20 rpm.
In a low-pressure die application, the die can remain on the extruder during purging until there is a complete change from the processing resin to the purging resin. Purging should continue until the extrudate is completely transformed from the processing resin to the purging resin. Once the die has been completely purged, stop the screw so that the die can be removed and the end of the screw exposed. Once the die is removed, the screw can be restarted and run at about 10 rpm to allow the remaining purge resin to be pumped out.
USE THE RIGHT TOOLS
Another big source of damage to screws during cleaning is using steel screw drivers, scrapers or pry bars to remove plastic. Tools and cleaning materials for "pristine" cleaning of a screw and barrel are few and simple: high-heat gloves, safety glasses, a brass putty knife, brass wire brush, copper gauze, stearic acid flakes, an electric drill, cotton rags, and a round brass wire brush about the ID of the barrel, mounted on a rod as long as the barrel.
Once the purging resin has stopped extruding from the screw, remove the screw from the machine. For an extruder with a screw cooling system, this apparatus of hoses, rotary union, and piping needs to be removed before the screw extractor mechanism can be attached to the extruder gearbox.
Using the screw extractor, the screw should now be pushed forward until four or five turns of the screw are exposed for cleaning. Clean the purge resin from the channels of the screw using the brass putty knife and brass wire brush. When the purge resin has been removed from the exposed portion of the screw, push another four to five turns of the screw forward using the screw extractor, and continue the cleaning process. The screw can eventually be pushed down most of the length of the barrel.
Once the large amounts of purge or HDPE have been removed with the brass putty knife and wire brush, sprinkle stearic acid flakes onto the root of the hot screw. (Stearic acid can be bought from a resin distributor.) Then use the copper gauze to remove any remaining residue. After the entire screw has been polished with copper gauze, do a final clean-up to "pristine" condition using a soft cotton rag. This will ensure that there is no contamination in the next production run.
Once the screw is completely cleaned, it can be set aside until the barrel has been cleaned, or placed on a screw rack until the next time it's needed. If the screw is stored, it should be sprayed and wiped down with light oil, such as WD-40 or PB Blaster to prevent rusting. Chrome-plated screws are less likely to rust during storage and don't need oiling.
CLEANING THE BARREL
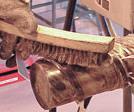
Cleaning the barrel is much easier than cleaning the screw, but just as important. With barrel temperatures still set at 400 F, the barrel is ready to clean. First, assemble the round wire brush, extension rod, and electric drill to make your cleaning tool. Then wrap the wire brush with copper gauze.
Before inserting the brush and gauze assembly into the bore of the barrel, throw in a handful of stearic acid. You can also sprinkle stearic acid over the copper gauze before pushing the brush/gauze assembly into the barrel. Once the brush/gauze assembly is inside the barrel, use the electric drill to rotate it while moving it in and out until it moves easily. You may need to use additional stearic acid before the bore is thoroughly cleaned.
When the brush/gauze assembly is removed from the barrel, push a bundle of cotton rags back and forth inside the length of the barrel to remove any purge or stearic acid residue. When the rags have been passed back and forth several times and return totally clean, barrel cleaning is complete. The entire screw and barrel assembly are pristine and ready for the next production run.


Related Content

Configuring the Twin Screw Extruder: Part 4
For many compounding operations, material is fed to the extruder at the feed throat. This is the case when feeding a single polymer or a blend of polymers mixed with solid additives. Some ingredients, however, present a challenge in feeding. Here’s how to solve to them.
Read More
How to Configure Your Twin-Screw Barrel Layout
In twin-screw compounding, most engineers recognize the benefits of being able to configure screw elements. Here’s what you need to know about sequencing barrel sections.
Read More
Improving Twin-Screw Compounding of Reinforced Polyolefins
Compounders face a number of processing challenges when incorporating a high loading of low-bulk-density mineral filler into polyolefins. Here are some possible solutions.
Read More
What to Know About Your Materials When Choosing a Feeder
Feeder performance is crucial to operating extrusion and compounding lines. And consistent, reliable feeding depends in large part on selecting a feeder compatible with the materials and additives you intend to process. Follow these tips to analyze your feeder requirements.
Read MoreRead Next

Beyond Prototypes: 8 Ways the Plastics Industry Is Using 3D Printing
Plastics processors are finding applications for 3D printing around the plant and across the supply chain. Here are 8 examples to look for at NPE2024.
Read More
People 4.0 – How to Get Buy-In from Your Staff for Industry 4.0 Systems
Implementing a production monitoring system as the foundation of a ‘smart factory’ is about integrating people with new technology as much as it is about integrating machines and computers. Here are tips from a company that has gone through the process.
Read More